


How Long Does a Dental Implant Last?
02/05/2025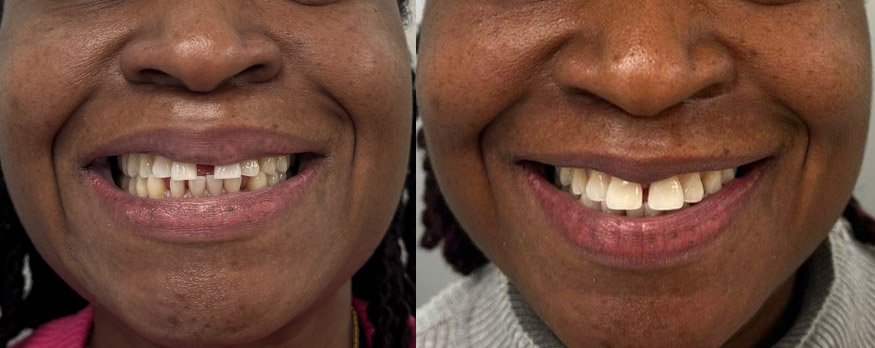
A 42-year-old patient came to us to replace old composite restorations and enhance her smile aesthetics. Using a minimally invasive direct composite bonding approach, we reduced the diastemas in the upper and lower anterior teeth while maintaining a natural and harmonious appearance.
Introduction
The presence of anterior diastemas is a common condition that can significantly compromise smile aesthetics and patient self-esteem. Therapeutic options include orthodontic treatment, indirect restorations (ceramic veneers), and direct composite restorations. Direct composite bonding represents a minimally invasive, cost-effective, and time-efficient solution; however, it requires careful planning and a high level of operator skill to achieve predictable aesthetic and functional outcomes.
This case report describes the replacement of previous composite restorations and the aesthetic rehabilitation of the maxillary and mandibular anterior regions using a direct composite technique.
Case Description
A 42-year-old international female patient presented in Albania for a three-day stay requesting replacement of existing composite bondings on the two maxillary central incisors and the mandibular intercanine sector.
The initial aesthetic concern that motivated the first treatment was the closure/reduction of extensive anterior diastemas. During the initial consultation, the patient was informed about different treatment alternatives:
- Indirect veneers in zirconia or lithium disilicate
- Orthodontic therapy
- Direct composite bonding
The advantages and limitations of composite bonding were discussed, including:
- Advantages: minimally invasive approach, maximum preservation of natural tooth structure, reduced cost, and fast execution.
- Disadvantages: operator-dependent aesthetic outcome, potential color instability over time, susceptibility to damage, and lower mechanical resistance compared to indirect restorations.
The patient was also informed that diastema closure would inevitably require an increase in the mesiodistal width of the involved teeth. After careful consideration, she firmly decided to proceed with the planned treatment.
Diagnostic Phase
On the first day, a complete medical and dental history was collected, and a digital panoramic radiograph was taken. Initial photographic records were obtained (Figure 1), and the old composite restorations were removed.

Figure 1. Initial situation before the removal of the old composite restorations.
Photographs of the natural teeth after removal were taken (Figure 2), and precision impressions of both arches were obtained using polyvinyl siloxane with a double-impression technique (putty + light body).
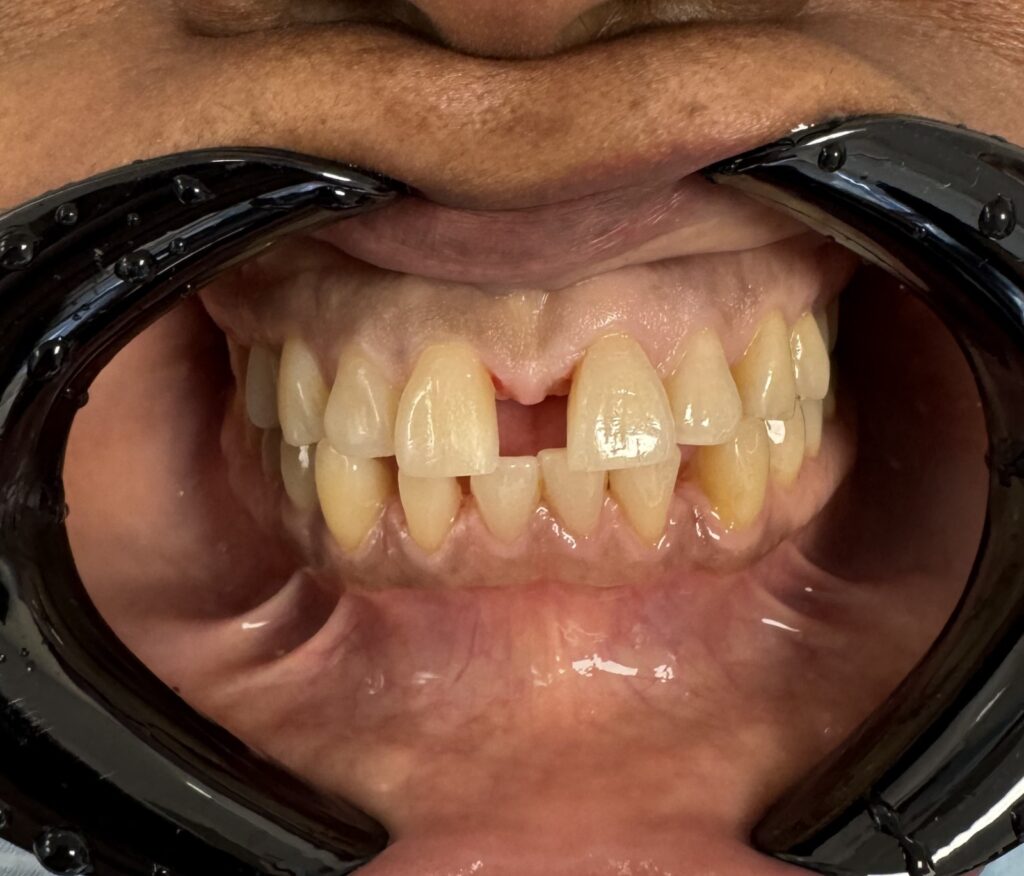
Figure 2. Natural teeth after the removal of the old composite restorations.
The impressions were immediately sent to the dental laboratory (The Lab Perfect Dent) for model fabrication and digital diagnostic wax-up based on the patient’s aesthetic requests. It was agreed not to completely close all spaces but to find a balance between diastema reduction and maintaining natural tooth proportions.
The patient expressed the desire for a natural-looking result without altering the original tooth shade.
Pre-operative Phase
While waiting for the wax-up, on the morning of the second day, a full professional dental cleaning was performed, followed by interproximal stripping and careful polishing of the anterior teeth to eliminate stains and discolorations.
Given the patient’s satisfaction with the achieved tooth shade, professional bleaching was avoided to prevent excessively white anterior teeth.
Treatment Planning and Aesthetic Guide
After reviewing the diagnostic wax-up, the patient approved the aesthetic project, which included direct composite bonding on teeth 11, 21, 43, 42, 41, 31, and 32.
The laboratory fabricated two opaque silicone indexes (maxillary and mandibular) to accurately transfer the planned morphology.
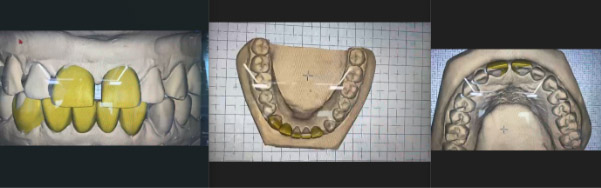
Figure 3. Digital diagnostic wax-up.
Operative Phase
On the afternoon of the second day, direct restorations were performed using a nano-hybrid composite resin (Olident Olirevo) on:
- Vestibulo-mesial surfaces of 11 and 21
- Mesial, distal, and vestibular surfaces of 43, 42, 41, 31, and 32
The silicone indexes ensured faithful reproduction of the wax-up morphology.
An opaque OA2 interproximal layer was applied to control light transmission, followed by a superficial A2 translucent layer to enhance aesthetic integration.
Restorations were finished, polished, adjusted in occlusion, and functionally shaped using progressively finer polishing discs and yellow-ring football-shaped diamond burs.
Gingival margins were refined by removing composite overhangs with red-ring blade burs, preserving soft tissue integrity and ensuring proper floss passage to the natural tooth contours.
Final Finishing and Immediate Follow-up
On the morning of the third day, a second finishing session was performed, focusing on lingual and palatal surfaces and the tooth–composite interfaces, eliminating steps, irregularities, and sharp edges to achieve smooth, uniformly polished surfaces.
Post-treatment photographs were taken, and detailed oral hygiene instructions were provided, including brushing technique and flossing, to prolong restoration longevity and prevent gingival inflammation.
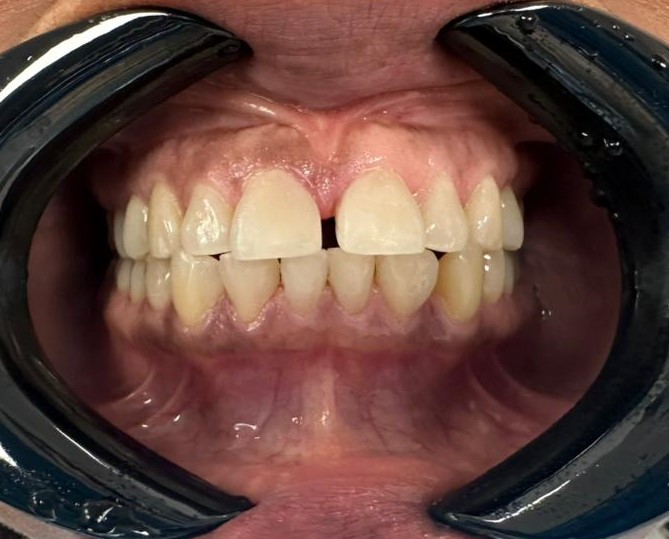
Figure 4. Final result.
Results and Conclusions
The treatment achieved a significant reduction of anterior diastemas, improving smile harmony while maintaining a natural appearance consistent with the patient’s expectations.
The patient expressed high satisfaction with both aesthetic and functional outcomes.
This case highlights that, when properly planned and executed, direct composite bonding is a valid minimally invasive option for aesthetic management of anterior diastemas.


Figure 5. On the left, the smile before treatment. On the right, the final aesthetic result.